Safety Products

Choctaw-Kaul

15'' Green Nitrile Gloves

$6.20
View details

Compliance Safety

Ventless Safety Goggles

$4.25
View details

Choctaw-Kaul

Series 122S Zipper Front Coveralls with Hood & Boots

$15.00
View details

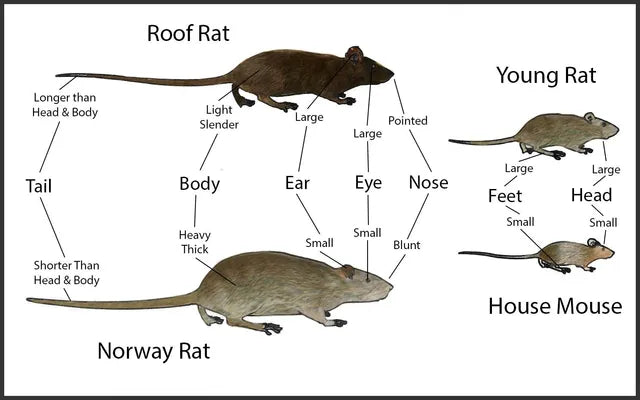
Rat Identification Guide

The Two Main Types of Rats in the U.S.

Rats are among the most destructive pests in the United States. They contaminate food, damage structures through gnawing and nesting, and spread parasites and diseases to humans and pets. The two primary species of rats that infest structures in the U.S. are roof rats and Norway rats. Both species are highly adaptable and can thrive in a variety of environments, including residential, agricultural, and industrial settings.

How Long Do Rats Live?

Adult rats typically live for 1 to 3 years. Females can start breeding as early as 2 months old but usually begin reproducing between 5 to 6 months. With a gestation period of 21 to 25 days, females can give birth to 6 to 13 pups per litter and produce 5 to 10 litters annually.

Call Us

Mon-Fri 9am-5pm ET

Email Our Pros

We’re here to help

Live Chat

Offline. Leave Us a Message

Rats Characteristics

Size

How Big Are Rats?

  • Roof Rats:
  • Norway Rats:

Shape

Rats share these physical characteristics:

  • 4 legs
  • Short fur
  • Tails that vary in length and are generally hairless
  • Beady black eyes
  • Two small ears

Common Myths:

  • Do Rats Have Bones?
    Yes, rats have bones, despite their ability to squeeze through tight spaces.
  • Do Rats Have Bladders?
    Yes, rats have bladders. However, they frequently urinate, which can appear uncontrolled.

Color

  • Norway Rats:
  • Roof Rats:

Range

  • Norway Rats: Found in nearly every state across the U.S.
  • Roof Rats: More commonly found in coastal areas, with a limited overall range

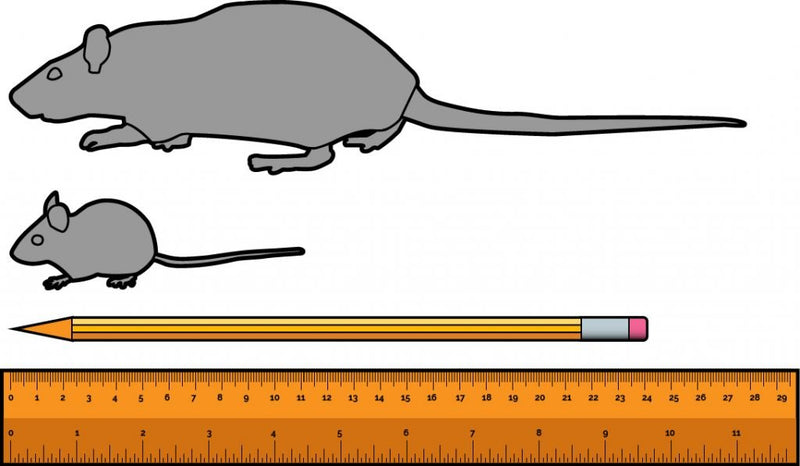
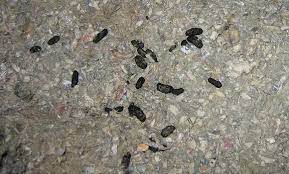
Rat Inspection Guide

Regularly Inspect for Signs of Rats

Rats can remain active throughout the year, making periodic inspections crucial to identifying potential infestations early. Detecting a rat problem in its initial stages allows for faster and more effective removal.

Rats often start by inhabiting the area surrounding a structure before attempting to gain access indoors. Begin your inspections outdoors, and if you find evidence of rats, extend your inspection inside. If rats are already inside, inspecting the exterior can help locate entry points.

Call Us

Mon-Fri 9am-5pm ET

Email Our Pros

We’re here to help

Live Chat

Offline. Leave Us a Message

Step1 Outdoor Rat Inspection

Signs of Rat Activity Outside

When inspecting outdoor areas, focus on dark, concealed spaces such as under decks, bushes, near doors and windows, woodpiles, accumulated yard debris, and other potential hiding spots. Look for the following signs that rats may be residing on your property:

  • Droppings: Rat feces are brown, cylindrical pellets approximately 1/2–1 inch long and about 1/8 inch in diameter. Check for droppings near pet food dishes, pet food storage areas, or recycling bins.
  • Burrows: Rats often dig burrows along building foundations, walls, around bushes and shrubs, or beneath yard debris. They may also burrow under compost piles or garbage cans. Burrow openings are typically 2–4 inches in diameter, with smooth edges from frequent use.
  • Runways: Rats repeatedly use the same paths to travel between nesting areas and food or water sources, creating noticeable "runways." These paths may appear as flattened grass or small depressions in soil or mulch. Observe for rats traveling along utility lines or fence tops during dusk or shortly after.
  • Gnaw Marks: Rats gnaw on hard surfaces like wood and pipes to control the growth of their teeth and gain access to food or nesting areas. Look for signs of gnawing on wood, pipes, or even fruits and nuts that have fallen from trees in your yard.
  • Carcasses: Rats living outdoors may leave carcasses, which could be brought in by pets or found drowned in swimming pools or hot tubs.

Inspecting outdoor areas thoroughly can help identify early signs of rat activity and prevent further infestation.

Step2 Indoor Rat Inspection

Signs of Rats Inside the Home

When rats move indoors, particularly in residential spaces, their presence often becomes apparent quickly. Depending on the species, rats may inhabit wall voids, attics, basements, cabinets, or storage rooms. While they generally avoid occupied living areas, a thorough inspection of all rooms is essential. Here are the common signs of a rat infestation inside your home:

  • Droppings: Rat droppings are brown, cylindrical pellets, typically 1/2–1 inch long and about 1/8 inch in diameter.
  • Urine: Rats urinate frequently, leaving behind a strong, musky odor. This smell is often most noticeable in nesting areas.
  • Grease or Rub Marks: As rats travel along the same paths repeatedly, their bodies rub against vertical surfaces, leaving greasy, gray marks. Check for these marks on beams, rafters, baseboards, door frames, and other areas where rat activity is suspected.
  • Gnaw Marks: Rats continuously gnaw on hard surfaces to manage the growth of their teeth. Look for gnaw marks on wood, pipes, or other materials as evidence of their activity.
  • Squeaking or Gnawing Sounds: While rats prefer to stay hidden, they are rarely silent. You may hear squeaking when they socialize or gnawing as they work on hard materials. These sounds are often most noticeable just after dusk and can help pinpoint their nesting locations.
  • Food Tampering: Rats are opportunistic feeders and will consume almost anything, including fruits, vegetables, grains, meats, and pet food. They often gnaw through food packaging to access the contents. Inspect pantries and pet food containers for gnaw marks or signs of tampering.

Pro Tip

Rat urine fluoresces under UV light. A blacklight or UV flashlight can help you detect rat urine in cabinets, storage areas, or other suspected locations. This method is commonly used by pest control professionals and can be a helpful tool during your inspection.

How to Get Rid of Rats

Sanitation and Removal

Successfully eliminating a rat infestation typically involves a combination of proper sanitation and effective removal methods.

  • Sanitation: Focus on removing food and water sources that rats rely on to survive. This step is essential not only for eliminating current infestations but also for preventing future ones.
  • Rat Removal: The removal process will vary based on personal preferences, the size of the infestation, and the specific situation within the structure. Choose a removal method that aligns with your comfort level and the severity of the infestation.
Call Us

Mon-Fri 9am-5pm ET

Email Our Pros

We’re here to help

Live Chat

Offline. Leave Us a Message

Step1 Eliminate What Rats Need to Thrive

Sanitation is the most critical step in resolving a rat infestation. Rats rely on accessible food, water, and nesting areas to survive. By addressing these needs, you can significantly reduce their population. Follow these sanitation tips to deter rats effectively:

  • Secure Food Storage: Store bulk food in large metal containers with tight-fitting lids instead of bags or boxes, which rats can easily chew through.
  • Pet Food Storage: Keep pet food in airtight containers, like Rubbermaid bins, and store them securely overnight.
  • Declutter Nesting Materials: Remove clutter, such as paper and cardboard, that rats may use to build their nests.
  • Yard Maintenance: Clear away grass clippings, leaves, and other yard debris near the structure.
  • Trim Vegetation: Prune shrubs and bushes so they do not touch your home and leave space underneath for better visibility.
  • Firewood Storage: Keep firewood stored away from your home or building.
  • Clean Fallen Produce: Regularly pick up fallen fruit and nuts from trees to prevent them from becoming a food source for rats.

Step2 Indoor Rat Control

How to Eliminate Rats Inside Your Home

Once you've followed the recommended sanitation measures, you can begin removing rats from your home. Several methods are available for indoor rat control, allowing you to choose the one that best suits your needs and preferences.

Method 1: Glue Traps, Snap Traps, and Live Catch Traps

Trapping Overview

Trapping is the preferred method for indoor rat control. Traps offer several advantages:

  • They eliminate the need for indoor poisons.
  • They provide immediate confirmation when a rat is caught, allowing you to monitor progress.
  • Traps allow you to remove the carcass, avoiding odors and secondary insect infestations caused by decaying bodies.

Snap Traps

Snap traps are made of wood, metal, or plastic and use a powerful hinge mechanism to kill rodents instantly.

  • Placement: Position traps where you observed rat activity during your inspection. Place traps perpendicular to walls with the trigger end almost touching the wall, or pair traps end-to-end parallel to the wall with triggers facing outward to catch rats from either direction.
  • Bait: Use aromatic baits like bacon, canned tuna, nuts, or peanut butter. Be cautious with peanut butter as its oils may damage certain traps over time. Secure solid baits to the trigger to prevent rats from stealing them without setting off the trap.
  • Alternative Baits: When food sources are abundant, try soft nesting materials like dental floss or cotton tied to the trigger.

Glue Traps

Glue traps consist of flat cardboard or shallow plastic trays coated in a strong adhesive.

  • Placement: Place traps flush against walls and in areas where rat activity is frequent. The adhesive traps rodents as they travel over them.
  • Scented Options: Some glue traps come pre-scented to attract rats.

Live Catch Traps

Live catch traps, or humane traps, are small wire cages with a baited trigger mechanism.

  • How They Work: Rats enter the trap to access the bait, triggering a pedal that closes the door behind them.
  • Bait: Use the same bait as snap traps.
  • Limitations: Check local regulations regarding the release of trapped rats. Live catch traps are less effective for large infestations or small juvenile rats.

Method 2: Rodenticide Baiting

While rodenticide bait can be used indoors, it is strongly discouraged.

  • Risks: After consuming a lethal dose, rats may die in inaccessible areas, leading to unpleasant odors and secondary insect infestations.
  • Tamper-Resistant Stations: If baiting indoors, always use tamper-resistant bait stations to protect children and non-target animals. Place stations out of reach and monitor for dead rats.

Myths Debunked

  • "Rats will leave the building after consuming bait." False. Rats do not leave the structure to seek water or food after eating poison.
  • "Poisoned rats will dry out and not smell." False. No product prevents the odor of a decaying rat carcass.

Pro Tip

Attic and Beam Nesting: If rats are traveling on exposed beams in attics or basements, secure Trapper T-Rex traps to the beams with zip ties.

Avoiding Trap Shyness: If a rat avoids traps, try camouflaging an unset trap in grain, straw, or sawdust in a shallow pan. Place bait pieces on top of the hidden trap for several nights. Once the rat grows accustomed to the bait, set the trap with the same bait.

Step3 Outdoor Rat Control

How to Eliminate Rats in the Yard

Controlling outdoor rat populations is often achieved using rodent bait poisons placed inside tamper-resistant bait stations. These stations protect the bait while allowing rats to enter, consume the poison, and carry it back to their nests.

Tools and Products Needed

  • Tamper-resistant bait stations
  • Rodenticide bait blocks
  • Patio blocks (optional)
  • Liquid Nails or similar adhesive (optional)

Placing Bait Stations

  • Use 4–6 bait stations around the structure. Place one station at each corner of the building, and consider adding one near the front and back entrances if needed.
  • For roof rats, use multiple smaller bait placements rather than fewer larger ones to improve effectiveness.

Securing Bait Stations

To ensure safety, anchor the bait stations so non-target animals or children cannot remove them.

  1. Purchase anchoring accessories if available for your bait station.
  2. Alternatively, use patio blocks and caulk adhesive. Apply the adhesive to the block and attach the bait station as per the product instructions.

Loading and Monitoring Bait Stations

  • Load bait blocks into the station according to the label instructions.
  • Check stations every 1–2 weeks and replenish bait as needed.
  • Be patient: Bait can take 5–10 days to kill rats after consumption. If bait consumption is high, it indicates a larger rat population than expected.

What to Expect

  • It’s normal not to see dead rats. They typically return to their hidden nests before succumbing to the bait.
  • Year-round baiting programs are recommended for roof rats, as seasonal baiting may be less effective when competing with natural food sources like ripe fruits.

Pro Tip

For roof rat infestations, consider using the JT Eaton Top Loader Bait Station, which can be attached to fences or tree branches. This placement encourages roof rats to consume the bait.

For further guidance, view our Rat Treatment Infographic for a comprehensive step-by-step overview.

Rat Prevention Guide

Rodent Proofing, Sanitation, and Baiting

Rats are a persistent problem for many homes, causing structural damage, contaminating food, and spreading disease. Unfortunately, property owners often find themselves in a cycle of repeatedly trapping or baiting rats without addressing the root cause of the issue.

Effective rat prevention focuses on rodent-proofing your home, maintaining proper outdoor sanitation, and implementing ongoing baiting programs. By taking these proactive steps, you can prevent infestations before they start and break the cycle of recurring rodent problems.

Call Us

Mon-Fri 9am-5pm ET

Email Our Pros

We’re here to help

Live Chat

Offline. Leave Us a Message

Step1 Sanitation & Exclusion

Proper sanitation and exclusion are essential steps in preventing and controlling rat infestations. Outdoor sanitation involves keeping your yard clean and free of debris, while exclusion focuses on sealing any potential entry points in your structure to keep rats out.

Exclusion

  1. Inspect the Foundation:
  2. Check Doors and Windows:
  3. Inspect the Roof:
  4. Seal Utility Entry Points:
  5. Prevent Climbing Access:

Sanitation

  1. Trim Trees and Shrubs:
  2. Remove Food and Water Sources:
  3. Manage Trash:
  4. Clean Up Rodent Waste:

By combining these sanitation and exclusion measures, you can significantly reduce the chances of rats invading your home or property.

Step2 Outdoor Prevention Treatment

If your property has been repeatedly targeted by rat infestations, we recommend placing partially loaded rat bait stations around the exterior of the structure. This proactive measure will help control the rat population before it grows out of hand.

How to Place Outdoor Rodent Bait Stations

Products and Tools Needed:

  • Tamper-resistant bait stations
  • Rodenticide bait blocks
  • Patio blocks (optional)
  • Liquid Nails adhesive (optional)

Placement Guidelines

  • Use 4-6 bait stations around the structure.
  • Place one station at each corner of the building. If necessary, add one station near the front entrance and another near the rear entrance.

Anchoring the Bait Stations

To ensure bait stations remain secure and out of reach of non-target animals and children:

  1. Choose an anchoring method:
  2. Attach the station to the patio block:

Loading and Monitoring the Bait Stations

  1. Load the rat bait blocks into the bait stations as directed on the product label.
  2. Check the stations every 1-2 weeks and replenish the bait as needed.

What to Expect:

  • As long as the bait is being consumed, it is actively working to eliminate rats.
  • Many people underestimate the size of the rat population on their property, leading to the assumption that the bait isn’t effective. However, increased bait consumption often means there are more rats than initially estimated.
  • Be patient: it can take 5-10 days for rats to succumb to a lethal dose of bait.
  • It is normal not to see dead rats. When affected by the bait, rats often retreat to their nesting areas, which are usually hidden, to die.

Pro Tip

For outdoor roof rat infestations, where rats are seen crossing fences or climbing trees, consider using a specialized bait station like the JT Eaton Top Loader. This station can be anchored to fences or tree branches, encouraging rodents to access the bait.